


Four-Window Phase-Shift Manual Stroker with Twin Indexed Collars
August 14, 2026
Three-Chamber Adjustable-Balance Capsule Vibrator with Index Collar
August 14, 2026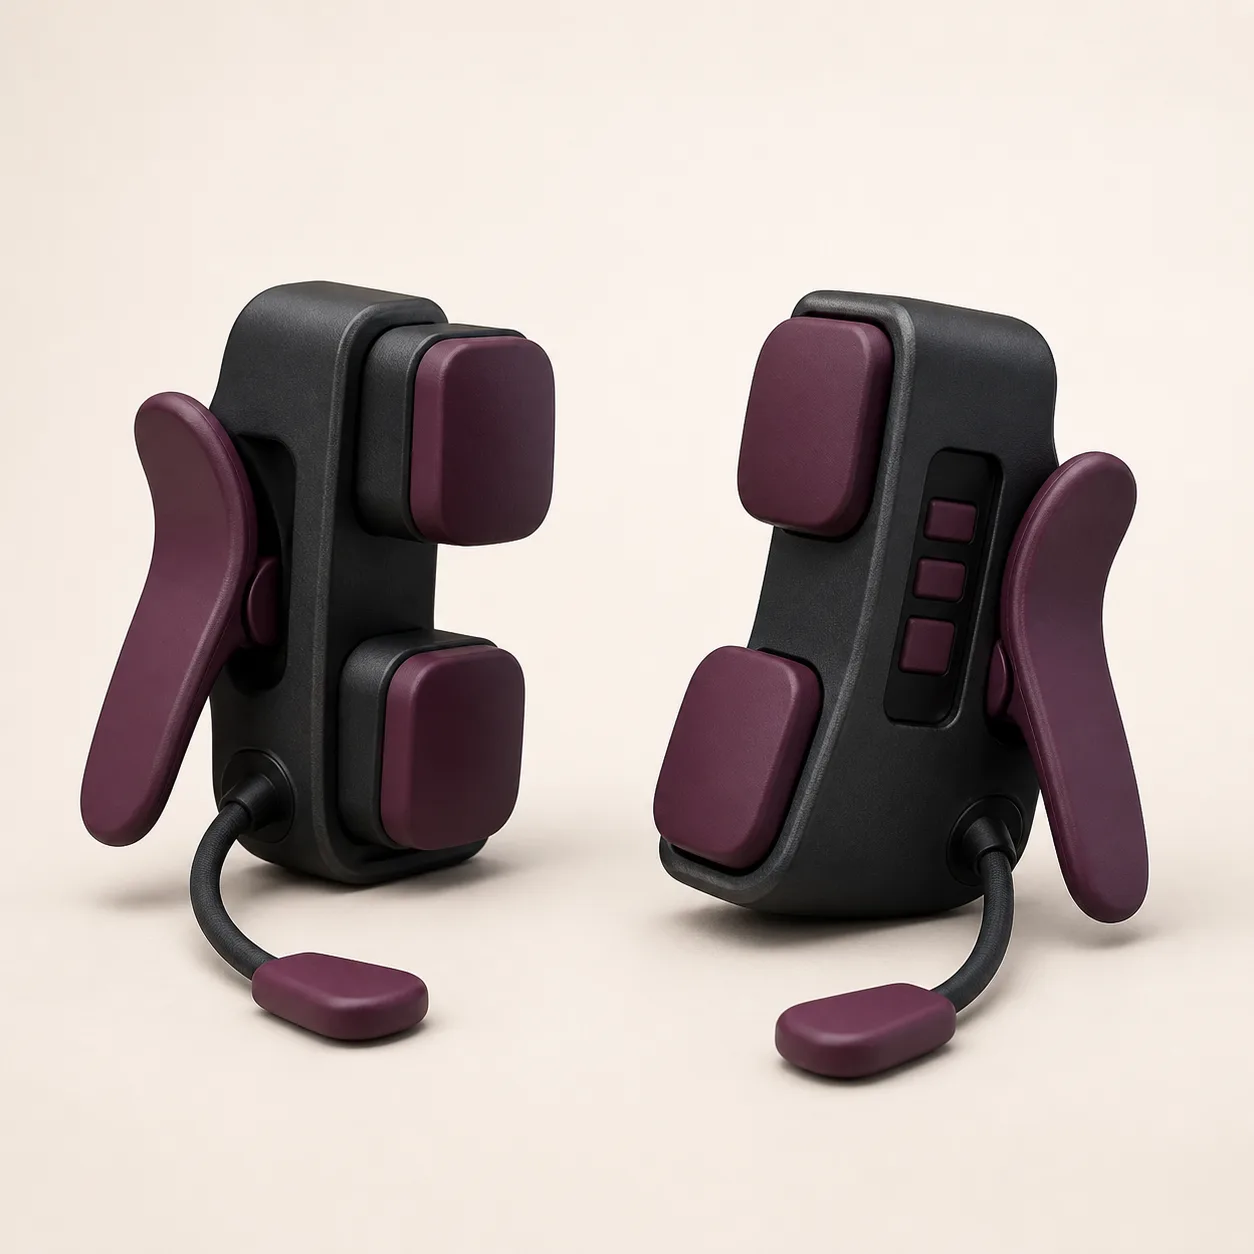
Lever-Release Parallel-Pad Sensory Clamps with Three-Stage Load Windows
A matched non-powered sensory clamp pair concept with broad parallel pads, oversized one-motion release levers and mechanical three-bar load windows.
29,99 $
200 in stock
Parallel pads separate pressure from release access
This lever-release sensory clamp pair replaces a small screw with broad opposing pads, an oversized side lever and a three-bar mechanical load window. Each clamp also carries a short flexible tether ending in a blunt pull tab for locating the release.

The window is only a proposed repeatability aid. It cannot define comfort, circulation or a universally safe pressure.
Confirm the matched pair and hidden mechanism
Inventory two complete clamps with upper and lower pads, parallel guides, lever hinges, load windows, springs and individual tethers. Ask the supplier to disclose internal cams, pivots, bushings, fasteners, adhesives and any replaceable pad parts.
Mixed spring revisions or a missing tether should place the pair on hold.
Measure pad geometry and usable jaw opening
Record pad length, width, thickness, corner radius, alignment and surface texture. Measure the minimum and maximum jaw gap, parallelism through travel, clamp mass, lever reach and tether length.
Broad pads can still create concentrated edge pressure if they tilt or meet unevenly.
Calibrate the three-bar window on a test fixture
Use a traceable force gauge and compliant calibration pad to map closing force when one, two and three bars appear. Repeat across both clamps, multiple openings and several controlled cycles.
The bars must be treated as device-specific indicators, not units of pressure or anatomical guidance.
Check hysteresis before relying on a repeated setting
Approach each bar from an open jaw and again after a short hold, then compare force and pad gap. Record any lag, overshoot, sticking or difference between increasing and decreasing load.
An indicator that displays the same bar at materially different forces fails its purpose.
Prove one-motion lever release under light load
On the calibration fixture, operate the plum lever with dry and damp gloved fingers while the clamp is set at each verified bar. Measure release force, travel and time until the pads open fully.
A lever that stalls, opens only partly, rebounds closed or requires a tool is unacceptable.
Treat the pull tab as access aid, not an anchor
Confirm whether pulling the blunt tab directly actuates release or merely helps locate the lever. Apply only the documented low tether load and inspect the cord root, tab edge and mechanism afterward.
Never attach weights, chain, restraint lines or another device to the tether.
Challenge jaw parallelism during side loading
Mount each clamp on a compliant test coupon and add controlled lateral disturbance below written limits. Watch for guide skew, pad rotation, edge-first contact, housing flex and unintended tightening.
Any tilted pad or self-increasing load requires rejection.
Cycle the cam, spring and indicator together
Run a documented open, set, hold and release sequence while logging bar position, force, jaw gap and release time at planned intervals. Inspect hinge wear, window fogging, pad migration and tether damage.
Cycle life must be established for the complete mechanism rather than the spring alone.
Start below the first verified indicator threshold
Practice opening and immediate removal on the test fixture before any external body contact. Begin with the lightest confirmed setting, keep both release levers visible and communicate continuously.
More bars are not a goal and do not indicate skill or suitability.
Use circulation and sensation changes as stop signs
These clamps are for brief external sensory use only. Stop immediately for pain beyond the agreed level, numbness, tingling, coldness, swelling, marked color change, loss of sensation or difficulty reaching a lever.
Never use on broken, irritated, inflamed or insensate skin, and never leave a clamped person unattended.
Avoid pairing with weight or immobilization
The design has no rated load point and must not support body weight, hanging mass or restraint tension. Keep movement modest so the clamp cannot snag, twist or become an unintended anchor.
The independent quick-release function should remain reachable by both participants throughout use.
Verify every contact and structural material
Request composition for pad skins and cores, housing, guides, cam, spring, lever, window, tether, pigments, lubricants and adhesives. Review hardness, porosity, corrosion, restricted-substance and skin-contact evidence for the exact production color.
Appearance does not establish pad softness, metal grade, allergy suitability or cleaner compatibility.
Clean around pads without flooding the load window
Open the jaws fully and follow confirmed mild-cleaning instructions. Wipe all pad faces and edges, then use a lightly dampened soft swab around guides, hinge recesses and tether roots while keeping unverified cavities dry.
Dry the parallel rails and indicator window before storage; soaking, boiling, bleach, alcohol and abrasive tools are not approved without exact evidence.
Price the mechanism above a basic clamp benchmark
An Alibaba adjustable-clamp showroom lists a basic stainless-steel clamp pair at USD 2.00-2.99 with a ten-pair minimum. It is a category benchmark only and does not establish this lever-release parallel-pad and load-window design, a legal supplier or a production quotation.
The procurement reference supports an EUR 29.99 planning price after allowing for China-origin freight, exact pair quotation, component and geometry checks, force-window calibration, hysteresis, lever-release testing, tether limits, side-load stability, cycle life, materials, corrosion, cleaning validation, protective packing and discreet fulfillment. Packed size, weight, freight, duty, tax, insurance, payment fees and destination terms require confirmation.
Frequently asked questions
Do the three bars show exact pressure?
No. They are proposed relative indicators and require device-specific force calibration on a test fixture.
Can the tether carry a weight?
No. It is an access aid only and has no load-bearing function.
Should both clamps feel identical at one bar?
Not until measured; pair-to-pair and left-to-right force variation must be tested.
How is a clamp removed quickly?
Keep the broad side lever visible, support the body and operate the verified one-motion release without pulling on skin.
Can the clamps be used during restraint?
Only if immediate release remains reachable and no line, weight or immobilizing load can act through either clamp.
Which faults require retirement?
A sticking lever, false bar reading, tilted pad, self-tightening jaw, cracked guide, corroded spring, loose tether, hard surface change or trapped residue.
Reviews
There are no reviews yet.